I wrote this post after a customer asked that I configure SNMP on all of their Cisco Collaboration applications and being unable to find a definitive set of instructions for how to complete this on PLM and PCD.
SNMP v2c Community String
You can add, view, modify and even delete SNMP community strings within the utils snmp config 1/2c community-string sub-commands. The CLI command appears to have one limitation compared to the GUI of supporting only a single IP address if you wish to limit the source IPv4 address that can use that string. Every separator I tried (e.g. space, comma, semicolon, etc.) caused the script to fail. If you have multiple SNMP source addresses I'd recommend leaving it at ALLHOSTS instead of creating separate per-source community strings since neither PCD or PLM have especially sensitive data on them.admin:utils snmp config 1/2c community-string add
ctrl-c: To quit the input.
Enter the community string:: examplereadonly
Enter the access privilege [ReadOnly]::
Enter the ip address to accept packets from. This is an optional parameter. Default is to accept packet from all hosts [ALLHOSTS]::
SNMP Master Agent must be restarted for changes to take effect. Would you like to restart this service now? [yes]:: no
The access privilege defaults to ReadOnly but will accept the following options: ReadOnly, ReadWrite, ReadWriteNotify, NotifyOnly, ReadNotifyOnly, or None.
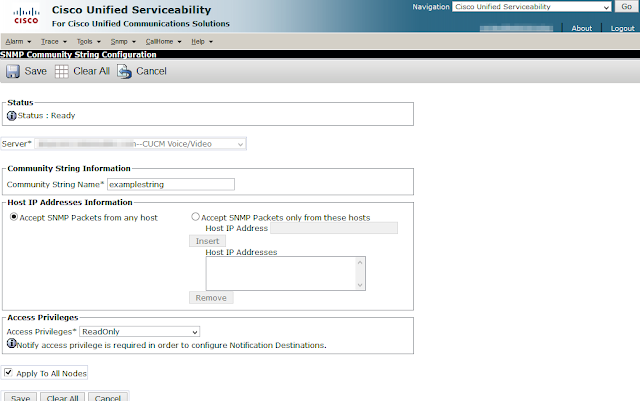
For comparison, here is how the same community string is created on Unified Communications Manager, Cisco Unified Serviceability under the SNMP > V1/V2 > Community String option of the drop-down menus.
 |
| Figure 1 - Screenshot of Cisco Unified Serviceability SNMP Community String Configuration |
MIB2 Contact & Location Details
The nearly universal MIB2 provides OIDs for System Contact (1.3.6.1.2.1.1.4) and System Location (1.3.6.1.2.1.1.6). These can also be set through the CLI. As with the community string it appears there is one limitation not present through the GUI: the input script does not support spaces, @ signs, or likely any other non-alphanumeric characters.admin:utils snmp config mib2 add
ctrl-c: To quit the input.
Enter the sysContact information:: ExampleAdmin
Enter the SysLocation information:: ExampleSiteName
Service Manager is running
SNMP Master Agent[STOPPING]
SNMP Master Agent[STOPPING]
Commanded Out of Service
SNMP Master Agent[NOTRUNNING]
Service Manager is running
SNMP Master Agent[STARTING]
SNMP Master Agent[STARTING]
SNMP Master Agent[STARTED]
admin:
For comparison, here is how the same community string is created on Unified Communications Manager, Cisco Unified Serviceability under the SNMP > System Group > MIB2 System Group option of the drop-down menus.
 |
| Figure 2 - Screenshot of Cisco Unified Serviceability MIB2 System Group Configuration |
SNMP Traps
Even though there isn't a graphical interface the underpinning requirements are the same. Anything that you cannot configure on the Cisco Unified Serviceability graphical interface is also blocked through the equivalent CLI command. Understanding this becomes helpful when you attempt to configure an SNMP trap because the command will fail if you have not already created a community string with NotifyOnly, ReadNotifyOnly, or ReadWriteNotify privileges.Example output when the community string referenced in the trap does not exist.
admin:utils snmp config 1/2c trap add
ctrl-c: To quit the input.
Enter the ipaddress of notification destination.(Note: Do not specify own IpAddress):: 10.1.70.242
Enter the portno [162]::
Enter the version v1|v2c [v2c]::
Enter the community string:: example trap
SNMP Master Agent must be restarted for changes to take effect. Would you like to restart this service now? [yes]:: yes
Invalid community string: example trap
Cannot execute the command
To successfully create an SNMP trap or inform destination you must first create a community string.
admin:utils snmp config 1/2c community-string add
[system will prompt you for the parameters]
Note: "SNMP Master Agent" Service will be restarted for configuration changes to take effect. Do not abort command after execution until restart is complete
If command is aborted during service restart, verify service status of "SNMP Master Agent" using command "utils service list"
If service is down, start it using command "utils service start SNMP Master Agent"
admin:utils snmp config 1/2c community-string add
ctrl-c: To quit the input.
Enter the community string:: example trap
Enter the access privilege [ReadOnly]:: NotifyOnly
Enter the ip address to accept packets from. This is an optional parameter. Default is to accept packet from all hosts [ALLHOSTS]::
SNMP Master Agent must be restarted for changes to take effect. Would you like to restart this service now? [yes]:: no
admin:utils snmp config 1/2c trap add
ctrl-c: To quit the input.
Enter the ipaddress of notification destination.(Note: Do not specify own IpAddress):: 10.1.1.100
Enter the portno [162]::
Enter the version v1|v2c [v2c]::
Enter the community string:: exampletrap
SNMP Master Agent must be restarted for changes to take effect. Would you like to restart this service now? [yes]:: yes
Service Manager is running
Commanded Out of Service
SNMP Master Agent[NOTRUNNING]
Service Manager is running
SNMP Master Agent[STARTING]
SNMP Master Agent[STARTING]
SNMP Master Agent[STARTED]
admin:
All of this directly maps to the options that exist within the Serviceability graphical interface. For comparison, here is how the same community string is configured on Unified Communications Manager, Cisco Unified Serviceability under the SNMP > V1/V2 > Community String option of the drop-down menus.
 |
| Figure 3 - Screenshot of Cisco Unified Serviceability SNMP Community String Configuration |
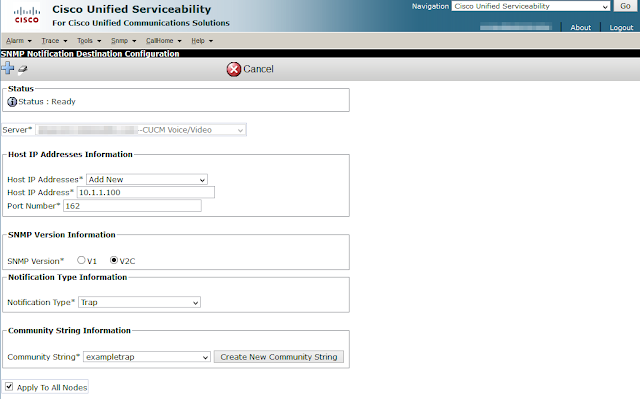
After creating a community string with the Notify privilege the trap destination can than be defined. Again, using UCM as a graphical example under the SNMP > V1/V2 > Notification Destination option of the drop-down menus.
 |
| Figure 4 - Screenshot of Cisco Unified Serviceability SNMP Notification Destination Configuration |

No comments:
Post a Comment